This documentation explains step-by-step how to configure the Meta WhatsApp Business API and integrate it into the Autom Mate platform. Each step is detailed and supported with warnings, tips, and recommendations where critical.
 1. Creating a Meta Developer Account
- Go to the Meta for Developers website.
- Log in with your Facebook account.
- Click “Get Started” or “My Apps” in the top-right corner of the page to activate your developer account.
![]() Tip: You may be required to verify your email and answer a few basic questions to activate the developer account.
Tip: You may be required to verify your email and answer a few basic questions to activate the developer account.
2. Creating a Meta Business (Business Portfolio)
- Go to Meta for Business .
- Create a new Business Account by entering a name, business type, and address details.
- Connecting a business portfolio to your app is only necessary for certain products and permissions. When you request access to these, you will be asked to link a business portfolio.
- You may need to verify your business.
![]() Warning: A verified Business Account may be required to use the WhatsApp Business API. However, verification is not mandatory for initial setup and testing.
Warning: A verified Business Account may be required to use the WhatsApp Business API. However, verification is not mandatory for initial setup and testing.
![]() Note: After this step, you will be able to link your app to this Business account (see Step 3).
Note: After this step, you will be able to link your app to this Business account (see Step 3).
3. Creating an App
- Go to Meta for Developers and go to apps page then click to the “Create App” button.

- Enter the App Name and Contact Email.
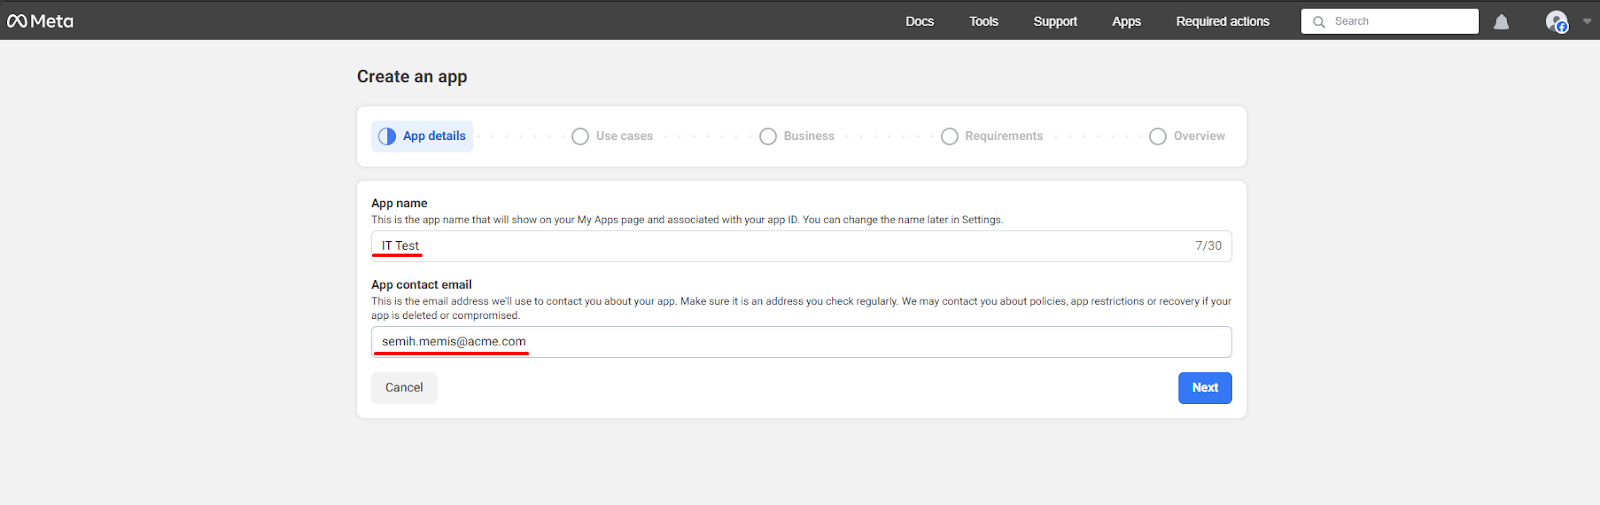
- In the Use Case selection screen, set the filter to All and select Other at the bottom of the list.


- Choose Business as the App Type.
- Once you proceed, the Business Account you created in Step 2 will be listed — select it to connect the app to your Business account.


![]() Tip: All future permission and access operations will be managed through this Business account. Make sure to select the correct one.
Tip: All future permission and access operations will be managed through this Business account. Make sure to select the correct one.
4. Creating a System User and Granting Permissions
- In Business Manager, go to the left menu: Users > System Users.
- Click Add to create a new System User and assign the Admin role.
- Select the created user and click Assign Assets to link the previously created app to this user.


![]() Warning: A system user cannot be created without an app. Therefore, app creation comes before this step.
Warning: A system user cannot be created without an app. Therefore, app creation comes before this step.
5. Creating a Permanent Access Token
- On the System User page, click Generate Token.
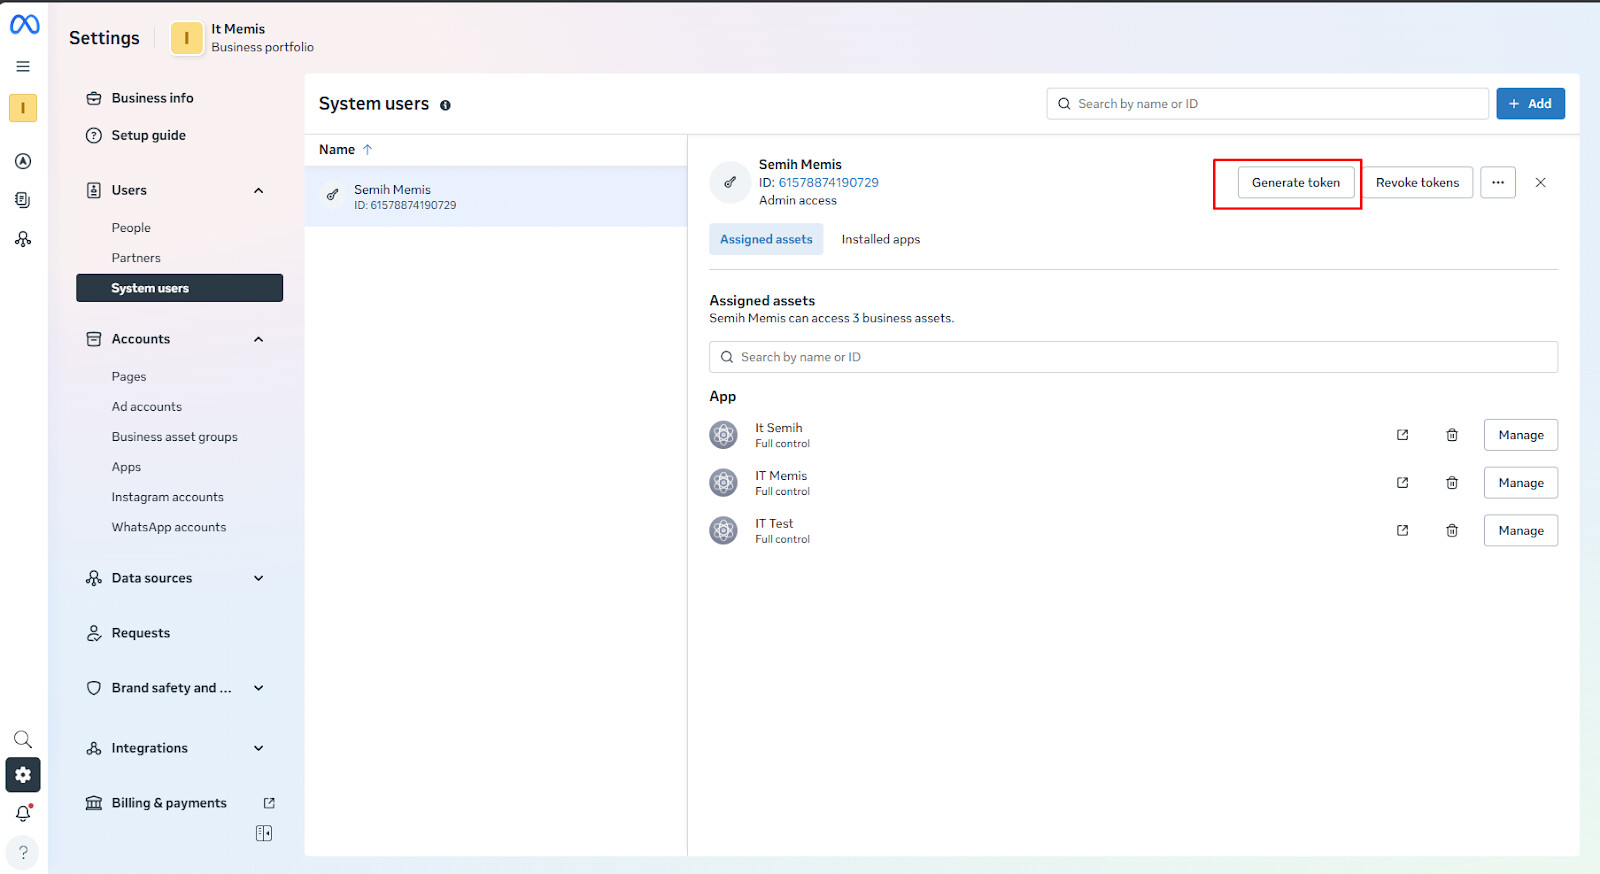
- Select your app.
- Set Token Expiry to Never.
- Be sure to select the following permissions:
whatsapp_business_managementwhatsapp_business_messagingwhatsapp_business_manage_events

![]() Tip: Select only the required permissions. Unnecessary ones may cause your app to be rejected or flagged by Meta.
Tip: Select only the required permissions. Unnecessary ones may cause your app to be rejected or flagged by Meta.
![]() Warning: Save this token! You won’t be able to view it again. It will be used inside the Autom Mate Vault.
Warning: Save this token! You won’t be able to view it again. It will be used inside the Autom Mate Vault.
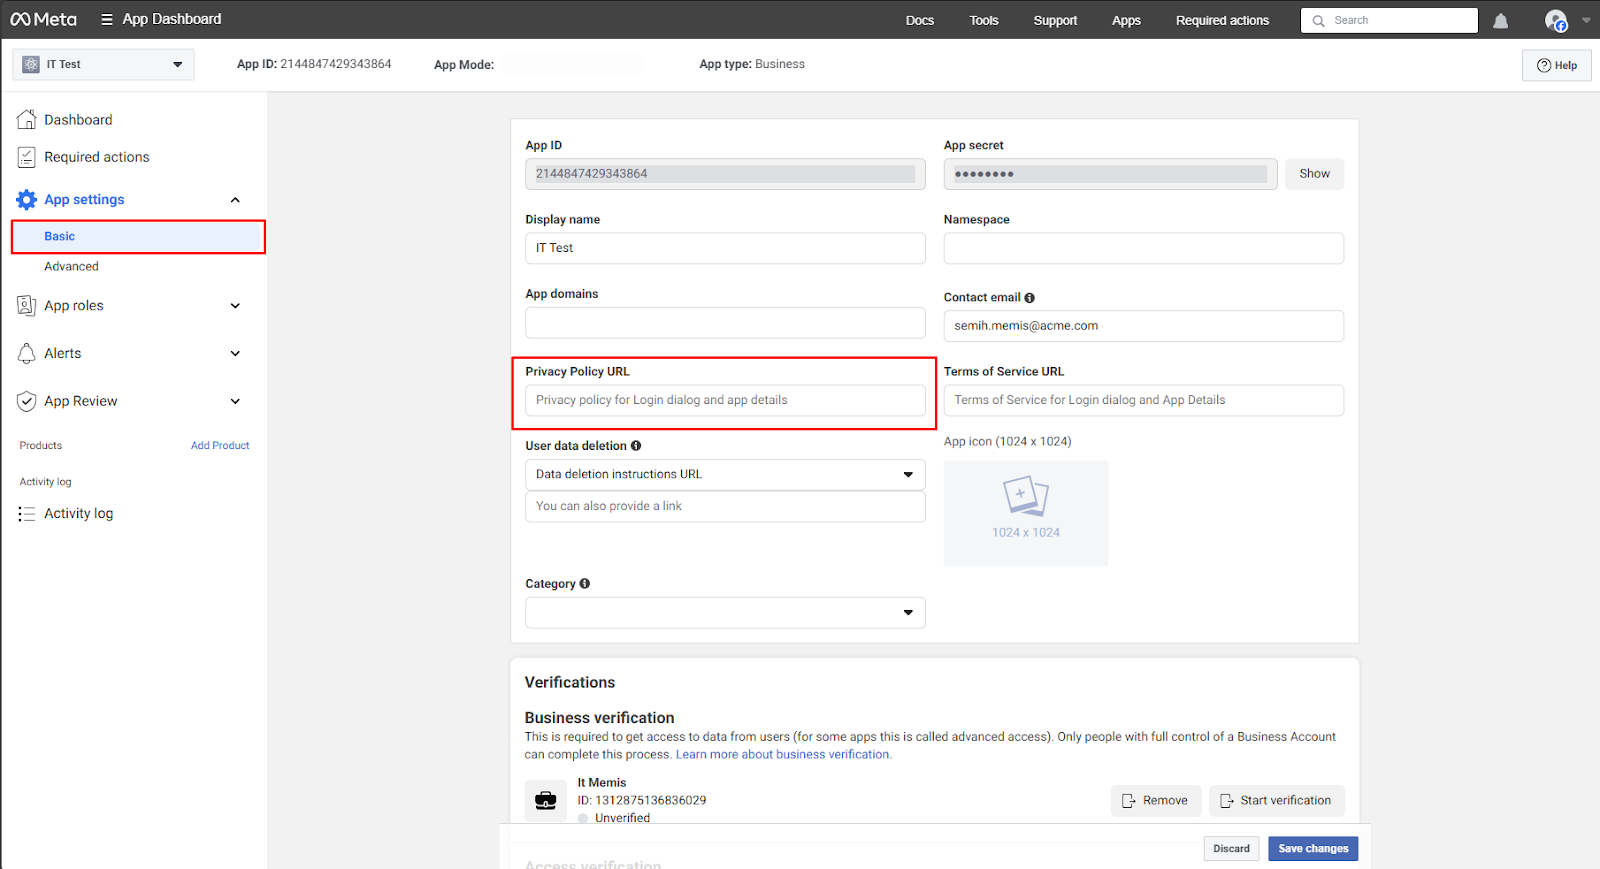
6. Setting the Privacy Policy URL
- In the developer panel, go into your app.
- Go to Settings > Basic on the left menu.
- Paste a valid privacy policy URL into the Privacy Policy URL field.
![]() Note: Leaving this field empty may prevent your app from accessing certain permissions as per Meta’s policies.
Note: Leaving this field empty may prevent your app from accessing certain permissions as per Meta’s policies.
7. Starting WhatsApp API Setup
- On your developer app’s homepage, go to Set Up > WhatsApp tab.

- Click the Start Using the API button.

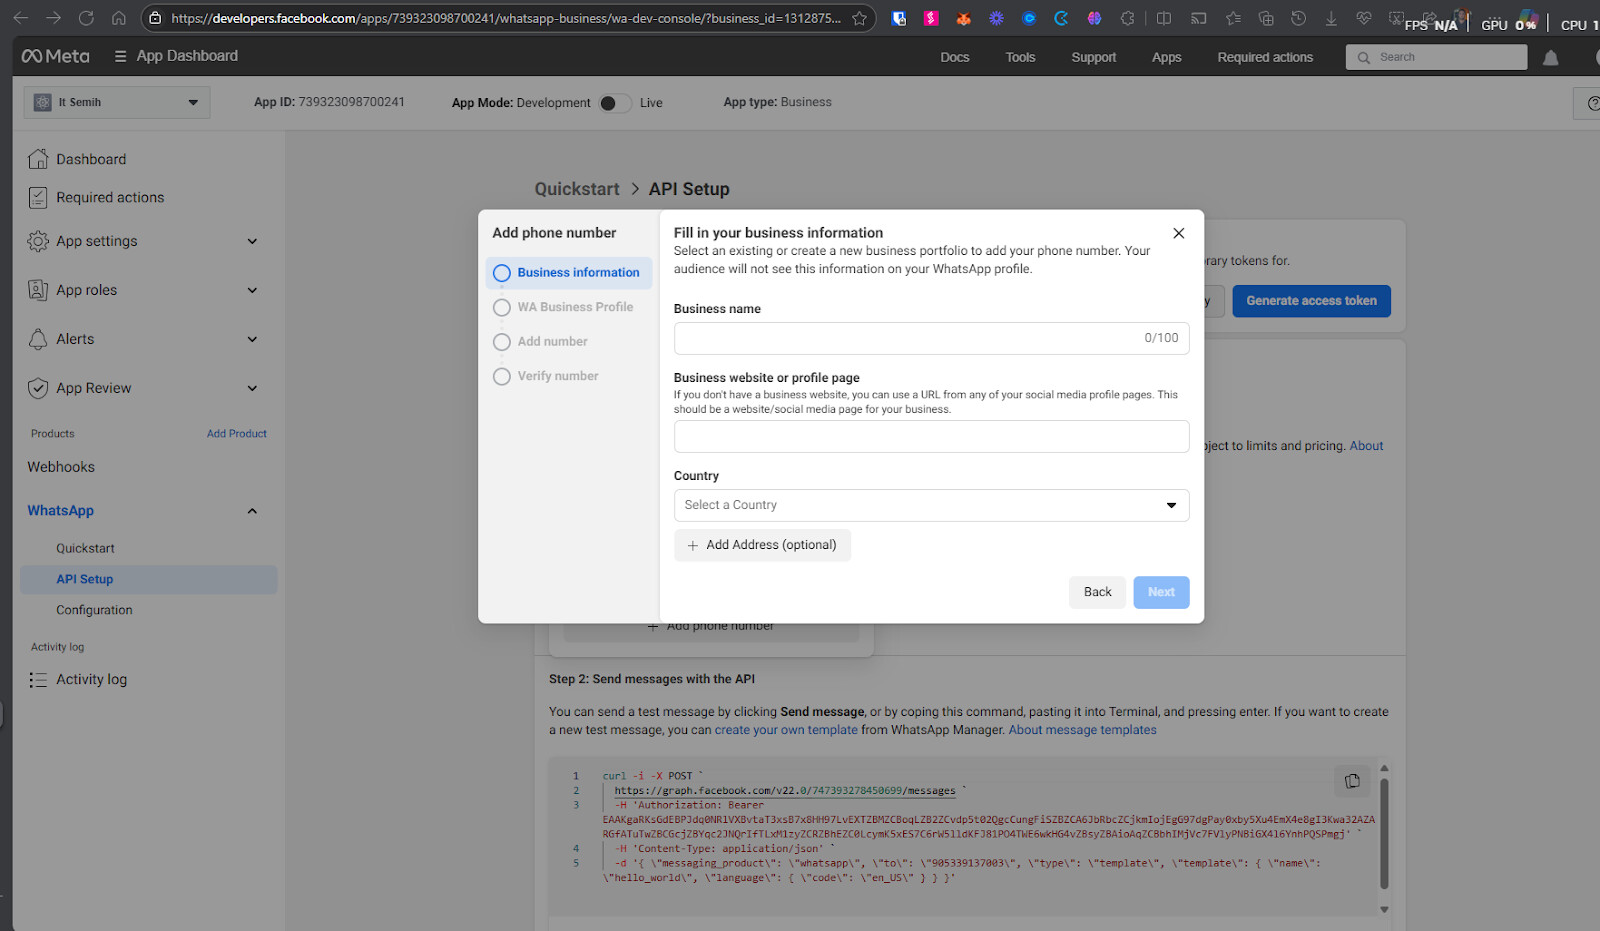
8. Adding and Verifying a Phone Number
- The system will direct you to the API Setup screen.
- Add a new phone number here.

![]() Warning: The number must not have been used in any other WhatsApp account. If it has, that account must be deleted first.
Warning: The number must not have been used in any other WhatsApp account. If it has, that account must be deleted first.
- Complete the number verification process.
9. Retrieving the Phone Number ID
- The verified number will be listed in the dropdown menu under the From field.
- The Phone Number ID listed under the number will be used in the Autom Mate Vault.

![]() Tip:
Tip:
This ID won’t work with test numbers. It must be a verified, real number.
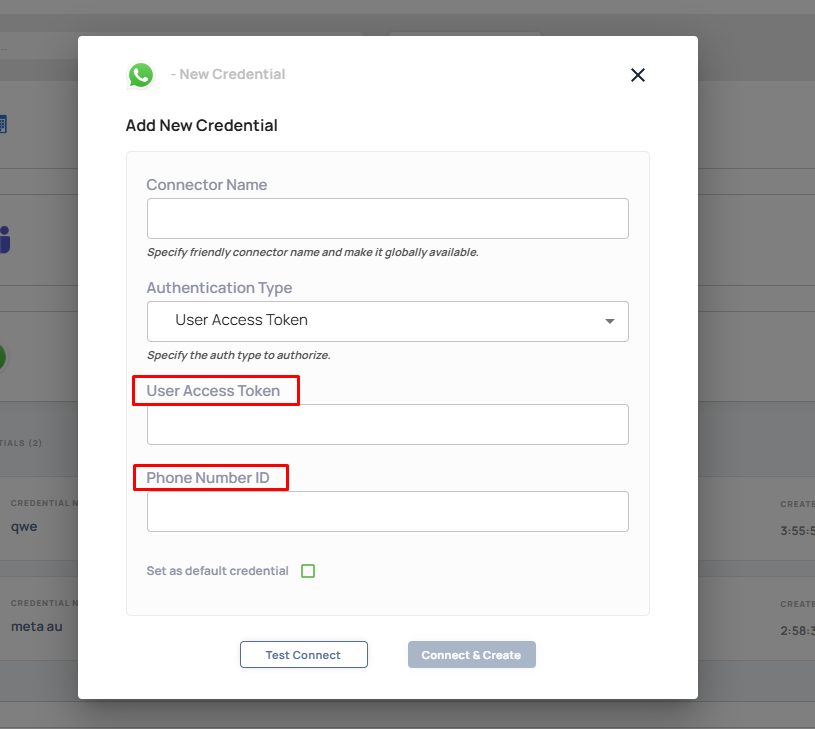
10. Creating App Credentials in Autom Mate Vault
Required fields:
- Token: The permanent token created in Step 5.
- Phone Number ID: The number ID obtained in Step 9.
![]() Result: You’re now ready to connect WhatsApp Business API with Autom Mate via the connector.
Result: You’re now ready to connect WhatsApp Business API with Autom Mate via the connector.
11. Setting Up the Webhook
- In the developer panel, go to your application and navigate to the Webhooks section.

- For Callback URL, select the webhook trigger type in Autom Mate and paste the webhook URL.

- Create a Verify Token and use the same value both in Meta and Autom Mate.
- Click Verify and Save.
- Finally, subscribe to the messages topic.

![]() Warning: The Callback URL must work over HTTPS and be publicly accessible.
Warning: The Callback URL must work over HTTPS and be publicly accessible.
12. Adding Payment Information
- In Business Manager, go to the WhatsApp Accounts section.
- Select your registered phone number.
- Under Payment Methods at the bottom, enter a valid payment method.

![]() Note: Meta allows test usage in some regions, but for live usage, a payment method is mandatory.
Note: Meta allows test usage in some regions, but for live usage, a payment method is mandatory.
13. Registering the Number via Autom Mate
- Create an Autom in Autom Mate.
- Add a Restful Web Services > POST action.
![]() Settings:
Settings:
URI:
https://graph.facebook.com/vXX.X/<PhoneNumberID>/register
Headers:
Authorization: Bearer <Permanent Token>
Content-Type: application/json
Body:
{
  "messaging_product": "whatsapp",
  "pin": "123456"
}
- Run the Autom to successfully register your number to the Meta system.

 Post-Integration Checklist
![]() Token is permanent and securely stored
Token is permanent and securely stored
![]() Phone Number ID obtained correctly
Phone Number ID obtained correctly
![]() App Credentials added to Autom Mate
App Credentials added to Autom Mate
![]() Webhook and message topics activated
Webhook and message topics activated
![]() Payment information completed
Payment information completed
![]() Register process completed successfully
Register process completed successfully
After completing all configuration steps, test your WhatsApp connection as shown in the video below. This ensures that the integration has been successfully established.
![]() If you encounter any errors during the test or experience issues such as messages not being delivered, please let us know in the comments section. Our community and support team will be happy to assist you.
If you encounter any errors during the test or experience issues such as messages not being delivered, please let us know in the comments section. Our community and support team will be happy to assist you.
![]() Note: Make sure your API keys are correctly configured, your app is live in the Meta Developer Console, and all required permissions have been granted.
Note: Make sure your API keys are correctly configured, your app is live in the Meta Developer Console, and all required permissions have been granted.
WhatsApp Business API Integration Test – Hello World Message via Autom Mate
This video demonstrates a basic integration test using the Meta WhatsApp Business API within the Autom Mate platform. It showcases the process of sending a simple “Hello World” message and receiving a response through the integration.
![]() Click to watch on YouTube: WhatsApp Guide
Click to watch on YouTube: WhatsApp Guide
